• Home
  • Categories
    • Beauty
    • Fashion
    • Lifestyle
  • Steals & Deals
  • About Me
  • Contact

Just Jodi Style

Hump Day Treat – Vegan Sloppy Joe’s

February 8, 2017

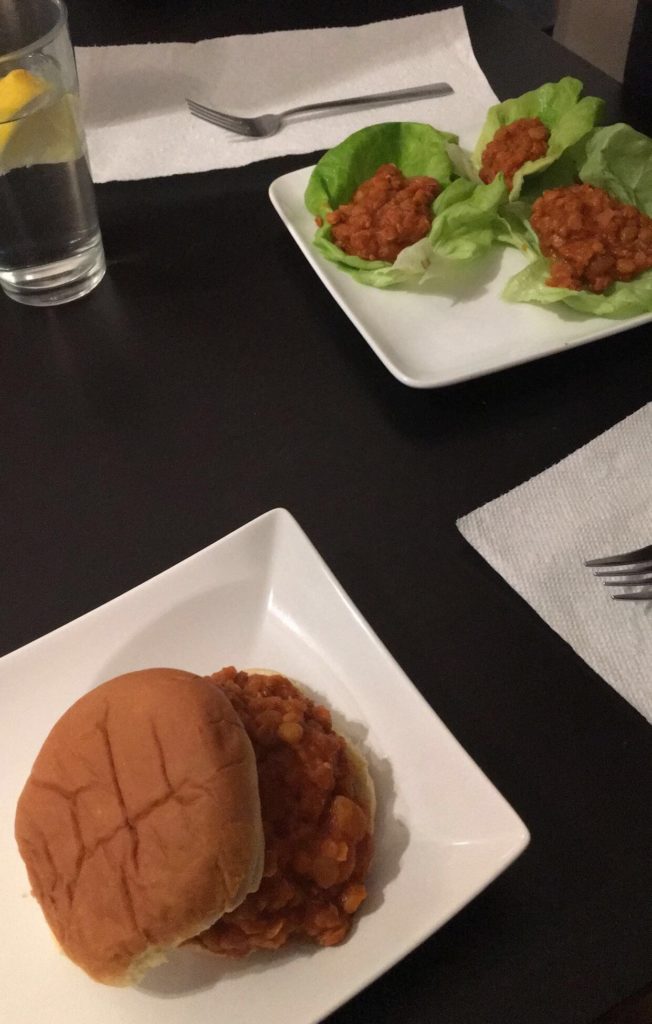
Happy Wednesday! For today’s hump day treat I wanted to share a recipe that everyone has been asking me about since I posted it in my instagram story on Monday night. For those of you who were asking they are vegan sloppy joe’s. You read that right vegan sloppy joe’s! I personally have only had sloppy joe’s maybe twice in my life and that was during summers at sleep away camp, but I had never had vegan sloppy joe’s until recently. A group of my friends we all get together every Monday night to watch The Bachelor and all the other shows including The Bachelorette and Bachelor in Paradise. My friend Ashley is a vegetarian and one of our other friends Riki is also vegetarian, but on top of that is gluten and dairy free. We all take turns making different dishes, but it has been a challenge finding something that everyone will and can eat. This dish that Ashley made is probably one of my favorites and is so filling that I personally didn’t even eat dessert! That is something that is very abnormal for me if you know me well. Here is what you need to make these delicious vegan sloppy joe’s:

Ingredients: (serves about 6)

1 tablespoon extra virgin olive oil

1 small onion, diced

1 red or yellow sweet pepper, diced

2 sticks of celery, finely chopped

1 teaspoon ground cumin

1 teaspoon chilli powder

1 cup (200g) French lentils

1- 28oz (796ml) can tomato sauce

3 tablespoons tomato paste

1 teaspoon Sriracha sauce

1 teaspoon salt

2 teaspoons balsamic vinegar

6 whole-wheat or sprouted grain buns, sliced in half or you can also use lettuce cups instead!

*If you want add additional toppings such as avocado, cheese, pickles, or sliced onions. Whatever you want!

Directions

1.Heat the olive oil in a medium, heavy-bottomed pot over medium heat.

2.Add the diced onion, pepper and celery. Cook for about 5 minutes and stir it all around until they are soft.

3.Then sprinkle in the cumin and chilli powder. After this let it cook for about a minute.

4.Add the lentils. Mix everything around.

5.Then add 3 cups of water, tomato sauce, tomato paste and sriracha. Mix it all around

6.Increase the heat to high and bring everything to a simmer. Cook this way for about 30 minutes uncovered stirring occasionally. If you notice that the level falls below the lentils then you can add more water.

7.Now do a taste test and if they lentils are tender then add salt and balsamic. Stir it all together and let it cook for one more minute after stirring.

8.Then serve and enjoy!
Hope you guys enjoyed today’s recipe! If you are in New York City like I am hope everyone is ready for the snow storm we are about to have tomorrow 🙂 <3

Here is the link to the full recipe as well Vegan Sloppy Joe’s


FacebookTwitterPinterest

Leave a Comment
Filed Under: Lifestyle Tagged With: February, Health, healthy, Hump Day, Hump Day Treat, recipe, Sloppy Joe, Sloppy Joe's, The Bachelor, Vegan, Vegan Sloppy Joe, Vegan Sloppy Joe's, Wednesday, Yum, Yummy

Hump Day Treat- Superbowl Ready

February 1, 2017

Happy February!! With Superbowl being this Sunday I thought that I would share with you a recipe that all of your guests would enjoy. I have added a little twist to the simple potato skins. Now as a kid I never really liked bacon. I know crazy right! However, recently I have discovered my love for Duck Bacon. Yes you read that correctly Duck Bacon. It was in my local Fairway Grocery store and it is delicious. Here is what you need to make these most delicious potato skins.

Ingredients:

4 – 6 Idaho potatoes depending on how many people you are having

1 package of duck bacon

1 chives

1 sour cream

1 package of sharp cheddar cheese ( I purchased kraft that was already shredded)


Directions:

1.Preheat the oven to 400 degrees

2.On a cookie sheet put down some aluminum foil. Pierce your potatoes all over. Line the aluminum foil with baking spray. Place the pierced potatoes on the cookie sheet and put them in the oven for an hour. (They should be able to be pierced with a fork)

3.When the potatoes have about 10 minutes left in the oven cut up the Duck Bacon into small pieces and fry them in a pan until crispy. Turn the heat down so they stay warm.

4.Once potatoes are done remove them and let them cool down for about 10 minutes.

5.Once they are cooled down cut them half lengthwise. Then scoop out the center not so that you see the bottom of the skin just enough so you can fill it with the cheese and bacon. You can use the excess potato insides for mashed potatoes or even gnocchi!

6.Put the sliced potatoes back on the same cookie sheet they just came off of. Cover them with cheese and the bacon. Put the broiler on in the oven and place them inside. I left mine in the oven for about 8 minutes even though the cheese was bubbling.

7.Remove from the oven and if you want cut them in half depending on if you want them into smaller bite sized treats.

ENJOY!!!!!


FacebookTwitterPinterest

Leave a Comment
Filed Under: Lifestyle Tagged With: Bacon, Cheddar, Cheddar Cheese, Duck Bacon, February, Hump Day, Hump Day Treat, Potato, Potato Skin, Potato Skins, recipe, Sharp Cheddar, Supberbowl, Superbowl Sunday, Treat, Wednesday, Winter, Yum, Yummy

Hump Day Treat: Salmon Patties

January 25, 2017

It’s Wednesday and you all know what that means it’s time for a hump day treat recipe. One of my favorite childhood memories of my Grandparent’s is how my Grandma would always make us lunch whenever my brother and I went over to my Grandparent’s apartment. Now since my grandparents kept kosher inside their home there was certain things that we weren’t allowed to eat while we were there because of it. She figured out quickly something that was easy to make for her and something that all the grandchildren would eat. Mac n Cheese with Salmon Patties! They were really salmon burgers but she liked calling them patties for us. So now she would make us the standard kraft macaroni and cheese from the box which we all know is a classic. Today I personally love to make the Cracker Barrel white cheddar mac n cheese. If you haven’t tried it already you need to do it right away! Now for the salmon burgers here is what you will need if you are cooking for yourself:

Ingredients:

1 can of pink boneless skinless salmon

Bread crumbs (I use the Italian ones)

2 eggs

Vegetable oil

Plastic gloves

Directions:

1.Put on the plastic gloves. Open the can of salmon and drain out the liquid. In a mixing bowl place the salmon that you have removed and drained from the can. Using your hands that have gloves on them mix it so it’s in small pieces.

2.Crack two eggs over the salmon. Now mix it all together with your hands so that the egg is all mixed in with the salmon.

3.After you have mixed the egg in pour a little bit of Italian bread crumbs in the bowl. My brother Ira always says more bread crumbs, but you don’t want it to be too much so that the patties are now dry. I always say add a ¼ of a cup at a time. When the salmon has a good consistency where it’s still a little sticky enough to make burgers then you have added enough.

4.In a frying pan heat up the vegetable oil. Once it is heated up place the salmon burgers in the pan. Once you see that the patties are getting brown on one side flip them over so the other side gets golden. Do that about 4 times so each side cooks 3 times on each side.
Hope you all enjoys today’s recipe and are having a great day! <3


FacebookTwitterPinterest

Leave a Comment
Filed Under: Lifestyle Tagged With: Cracker Barrel, Hump Day, Hump Day Treat, January, Kraft, Kraft Mac N Cheese, Mac n Cheese, recipe, Salmon, Salmon Patties, Wednesday

Hump Day Treat – The Perfect Lunch

January 18, 2017

Happy Wednesday! Now for a great hump day treat I am going to share with you all what I normally eat during the week for lunch. Now if you ask any of my family members as a child I hated vegetables. You couldn’t pay me to eat one even if I got just plain pasta at a restaurant and they put any green on it as a garnish I wouldn’t eat it. Yes I was one of those kids when it came to certain things. However, I now eat vegetables every single day. I try to have for lunch everyday a protein and a veggie. Now for some of you who don’t necessarily like veggies there are so many ways to eat them that you didn’t think of before. Like if you don’t like steaming your vegetables another great way to eat them is by cooking them in the oven. Another way to eat veggies that is a huge craze is by spiraling them. I saw a 4 year old eating a plate full of zucchini pasta out at a restaurant and he had no idea because it was spiraled and he thought it looked fun to eat. So today for lunch I made it simple. I took a little bit of olive oil and coconut oil and drizzled it over some broccoli and cut zucchini in a baking pan that I normally use for brownies. I lined it with aluminum foil to help make it less messy. I know that coconut oil is better for you, but I with certain things I still don’t fully like the taste of it if there isn’t any olive oil in it so I am slowly transition all my veggies being cooked with coconut oil. I set the oven to 400 degrees and every 5 – 8 minutes I stir them around so they don’t stick to the pan and also so they brown on both sides. While the veggies are cooking I heat up a small fry pan with some coconut oil and I grill some onions. Now I am like my father where I like my onions cooked well done to the point where they are almost black in color.  Once the veggies are close to being done in the oven and the onions are almost done cooking I add a ¼ tsp of chopped garlic into the pan and then cut up raw chicken. I found that the coconut oil and the onions with the garlic gives the chicken enough flavor. The vegetables in the oven shouldn’t take more than 20 – 25 minutes tops. You should always have some sort of protein and vegetable in the middle of your day especially at work because it will help boost your energy. Hope everyone is having a great day! <3


FacebookTwitterPinterest

Leave a Comment
Filed Under: Lifestyle Tagged With: Broccoli, Chicken, Coconut Oil, Garlic, grill, healthy, Hump Day, Hump Day Treat, Lunch, Olive Oil, Onion, Onions, Perfect Lunch, Vegetable, Veggies, Wednesday, Zucchini

Hump Day Treat! One tray meals

January 11, 2017

Happy Wednesday everyone! Hope everyone is having a great hump day and enjoying their week so far. Today I want to talk about cooking in general. Now the other night when I made my friend cauliflower pizza for dinner if you ask my friend Rachael, who so graciously let me use her kitchen that night, I used every dish / pot / pan possible that she had. I am one of those people that I hate eating a meal after cooking without cleaning up after myself beforehand. So I have discovered ways to make it easier for myself and for my sanity while cooking and cleaning. Yesterday for lunch I wanted some roasted broccoli, but I also wanted some salmon. So instead of cooking the salmon on the stove I put it in aluminum foil almost like a pouch. I then place it on a cookie sheet that was lined with aluminum foil and sprayed it and laid my veggies on the side of it. It also makes it an easy clean up if you are using sauces with your meat / fish that you are cooking. For example I used a sesame ginger glaze for my salmon and cooking it this way i can just pick up the “salmon pouch” that i made using aluminum foil and place it direct onto my plate. At the end of the day I used max 3 things for this meal including a cutting board, a cookie sheet with aluminum foil and then the plate I used to eat my meal. There are so many things you can cook together on a cookie sheet in the oven that you may realize now. Hope you all have a great day and if you are interested in seeing things for hump day treats comment below and let me know!


FacebookTwitterPinterest

Leave a Comment
Filed Under: Lifestyle Tagged With: Broccoli, Cookie Sheet, Hump Day, Hump Day Treat, January, Mushrooms, One Pan, One Pan Meal, Oven, recipe, Salmon, Veggies, Wednesday

Hump Day Treat! Recovery Protein Bowl

January 4, 2017

Happy Wednesday everyone! With it being the first week of 2017 I thought that I would give you all a healthy recipe for those of you that their new year’s resolution was to eat healthier. My friend Brooke who I worked with when I interned at Glamour Magazine is honestly one of my fitness inspirations. She is currently training and going to be running the marathon in London after running the marathon in NYC this year. Yesterday she posted this amazing protein bowl and I had to ask her how to make it. These are a great alternative to those who don’t necessary like having a smoothie or are still looking for a healthy alternative this new year.

Ingredients:

Almond Milk – plain almond milk, but if you want to try vanilla almond milk I did and it tasted great!

Ice

One Large Frozen Banana (peel it before freezing it! I learned that mistake the hard way)

Plant Protein – My friend got hers from Garden of Life

Almond Butter


I did this myself today in a blender and I started with a ¼ of a cup of almond milk and added more as I saw fit and I did the same with the almond butter and plant protein. I personally love protein shakes, but only when they taste more fruity than protein. If you have a nutribullet you can also  make this in there as well. It may be easier if you want to use the container to bring it to work with you on the go. Brooke topped hers off with flaxseed, walnuts and organic shredded coconut. YUM! I personally put on top of mine some of the organic coconut and strawberries.  Hope everyone is having a great day and for those of you in New York City I hope you are all preparing for the snow that we are suppose to get on Friday! <3


Image was taken from Brooke’s instagram story 🙂


FacebookTwitterPinterest

Leave a Comment
Filed Under: Lifestyle Tagged With: 2017, Almond butter, Almond Milk, Frozen Banana, Hump Day, Hump Day Treat, January, nutribullet, Protein, Recovery, Wednesday, Winter

Hump Day Treat – New Years Appetizers

December 28, 2016

Happy Wednesday! With New Years Eve fast approaching I know that everyone who is throwing parties or having people over before a night on the town are trying to get all the last minute goodies together. One of my favorite appetizers to make is a baked brie. I have featured the recipe here on Just Jodi Style, however it is a bit of a messy clean up especially when you may be leaving to go out right after. One of the best things that I have found to use for any kind of appetizer are pre made filo cups that you can find in any freezer section at your local grocery store. I personally keep one package always on hand in my freezer just in case. Now there are so many things you can do with these filo cups. You can fill them with brie and jelly, spinach, cheddar cheese with bacon or even chocolate! There are so many options that you can do it just all depends what you want to have for your party. I have used this when I don’t want to make the whole baked brie and it is the easiest clean up. My only warning is you don’t realize how hot it is when you bite into it so don’t serve them straight from the oven. Give them at least 5 minutes to cool before serving. Otherwise based upon personal experience you will burn the roof of your mouth. OUCH! If you are making it in the oven I suggest putting it in the oven at 375 degrees for about 20 minutes with any dish. Hope everyone is having a great Wednesday! <3


FacebookTwitterPinterest

Leave a Comment
Filed Under: Lifestyle Tagged With: Appetizers, December, Hump Day, Hump Day Treat, New Years, New Years Appetizers, recipe, Treat

Hump Day Treat – The French Apple Tart

December 21, 2016

Happy Wednesday! Today is my Mom’s birthday and in honor of that I wanted to share with you one of her recipes that she recently made this past Thanksgiving. Now my Mom and I both love sweets, but when it comes to the holidays my Mom is the master at dessert. I have always loved apple pie, but no one other myself would eat it. So this past Thanksgiving my Mom made a thin french apple tart and when I tell you that it looked like a work of art I am not joking. It was so thin and delicious that it didn’t even feel like you were eating anything. I honestly now prefer this than an apple pie. It was that good! Here is the recipe for this amazing dish.

Ingredients:

½ (15 ounce ) package refrigerated pie dough ( pillsbury has these)

¼ cup sugar

½ teaspoon ground cinnamon

2 pounds Golden Delicious apples, peeled, cored and thinly sliced (Try to make them as thin as possible)

2 ½ tablespoons honey

½ teaspoon vanilla extract

Directions:

1.Preheat oven to 425 degrees fahrenheit

2.Place dough on a lightly floured surface

3.Roll into a 12 inch circle and place on a 12 – inch pizza pan

4.Combine sugar and cinnamon and sprinkle 1 tablespoon of the sugar mixture over the dough

5.Arrange apple slices spokelike on top of the dough. Do this by working from outside edge of the dough to the center

6.Sprinkle app over the remaining apple slices that are now on the dough the remaining sugar mixture

7.Place in the oven for 30 minutes

8.Right before  you are about to take the apple tart out of the oven combine the honey and vanilla in a microwave safe bowl

9.Microwave on high for 40 seconds

10.Take the tart out of the oven. While the tart is still warm brush honey mixture over it.

11.Serve this dessert warm and if you like with a scoop of vanilla ice cream. ENJOY!

Hope you all enjoy my mom’s recipe on her birthday <3 Love you mom!


FacebookTwitterPinterest

Leave a Comment
Filed Under: Lifestyle Tagged With: Apple, Apple Tart, December, French, Hump Day, Hump Day Treat, Mom, recipe, Thin Apple Tart, Thin French Apple Tart, Thin Tart, Treat, Wednesday

Hump Day Treat – Father Christmas Hats

December 14, 2016


Happy Wednesday! It’s time for another hump day treat recipe here on Just Jodi Style and today’s theme is Christmas. I personally don’t celebrate the holiday, but I do love all of the delicious treats that come along with it. This recipe I found from Tastemade and they look absolutely adorable! Check out the recipe here below.

Ingredients:

  • 24 strawberries
  • For the cake
  • 200g unsalted butter, softened
  • 25g vegetable oil
  • 260g caster sugar
  • 2 eggs
  • 300g plain flour
  • 1 ½ baking powder
  • 2 tbsp cocoa powder
  • ⅓ cup whole milk
  • For the frosting
  • 125g unsalted butter
  • 200g icing sugar
  • 100g cream cheese

Directions:

  1. Preheat the oven to 356 degrees .
  2. Cream together the butter, oil and sugar until pale.
  3. Add in the eggs one at a time, mixing well between each one. Turn the whisk right down, if using an electric one, and add in the milk.
  4. Sift in the dry ingredients and fold through the mix.
  5. Grease the mini cupcake tray, and place a teaspoon amount of the mix into each of the cake holes.
  6. Place in the hot oven for around 12 minutes until fluffy and cooked through. The way to check if they are cooked all the way through is to poke the cupcakes with a toothpick. If the toothpick comes out clean then it is cooked!
  7. While the cupcakes are baking, make the frosting.
  8. Whisk the butter with an electric whisk until very pale. Then on a low speed, whisk in the icing sugar and once combined, whisk in the cream cheese till just mixed. Place in a piping bag with a round hole nozzle attached or simple cut off the end of the piping bag.
  9. Once the cakes are out and cooled, pipe a spiral shape on the top of the cakes. Start from the outside and slowly work your way into the centre.
  10. Trim the top of the strawberry and place on top. Finish with a blob of frosting on the top.

And there you go! Hope you all enjoy and have a great Wednesday <3

Link to the TASTEMADE website <3

image taken from google


FacebookTwitterPinterest

Leave a Comment
Filed Under: Lifestyle Tagged With: Channukah, Christmas, December, Father Christmas, Father Christmas Hats, Hats, Holiday, Holidays, Hump Day, Hump Day Treat, recipe, Treat, Wednesday

Hump Day Treat – Dog Cakes

December 7, 2016

img_7079

img_7059-3

Happy Wednesday Everyone! So if you saw yesterday’s post you know that it was my sweet puppy Stella’s 1st birthday! Now I didn’t have the chance to throw her a birthday party ( Yes that is a thing dog birthday parties don’t laugh) and I wanted to make her birthday extra special. I had previously taken Stella to her first birthday party for her puppy friend Oliver and his mom had got him a cake made from a bakery in the city. Now I didn’t think of getting a cake made until this past weekend and I knew it would be too late to order one so I thought why not make one myself? How hard could it really be? I searched different stores to get a cake pan in the shape of a dog bone first, but since it was just for Stella I opted out to make 3 small pie ones instead of one large one. Thanks to food.com for the recipe Stella really did enjoy it and still this morning is looking to see if she left any crumbs on the ground 🙂

Ingredients:

1 egg

¼ cup peanut butter ( I used skippy natural creamy)

¼ cup cooking oil ( I personally used vegetable oil)

1 teaspoon vanilla extract

⅓ cup of honey (optional but I personally used it)

1 cup carrot, shredded

1 cup whole wheat flour ( if you don’t have whole wheat flour then use white flour but it’s better with whole wheat flour)

1 teaspoon baking soda

Directions:

1.Preheat oven to 350 degrees

2.Grease your baking pans that you chose to use. For me I chose 3 small disposable pie tins.

3.Combine the egg, peanut butter, oil, vanilla and honey (if you use honey) in a large bowl. Blend well

4.Stir in the carrots and mix thoroughly

5.Now add in the flour and baking soda and mix it all together fully

6.Spoon the batter into prepared pans. To make the batter flat in the pan just lift it up and lightly tap it to the counter surface. I personally do this when I get froyo in order to add more into my cup!

7.If you want add on top a milkbone, but don’t push it into the cake just place it nicely on top of the batter

img_7055

8.Bake in oven for 40 minutes

9.Take out cakes and let them cool in pan for 10 minutes then if you have put on a wire rack to cool completely or onto a different plate.

Hope all of your furry friends enjoy this cake! Stella for sure did <3

If you want to see the recipe yourself here is the link Dog Cake Recipe 


FacebookTwitterPinterest

Leave a Comment
Filed Under: Lifestyle Tagged With: Birthday Cake, Birthday Cake for Dogs, Cold, December, Dog, Dog Cake, Hump Day, Hump Day Treat, recipe, Treat, Wednesday, Winter

  • « Previous Page
  • 1
  • 2
  • 3
  • 4
  • Next Page »

Social

  • Facebook
  • Instagram
  • Pinterest
  • Twitter

Archives

Site design by Aubrey Kinch Design Studio & development by Olive & Ivy Design