• Home
  • Categories
    • Beauty
    • Fashion
    • Lifestyle
  • Steals & Deals
  • About Me
  • Contact

Just Jodi Style

Hump Day Treat! Rainbow Pop Tart

November 30, 2016

rainbowpoptarts4

rainbowpoptarts7

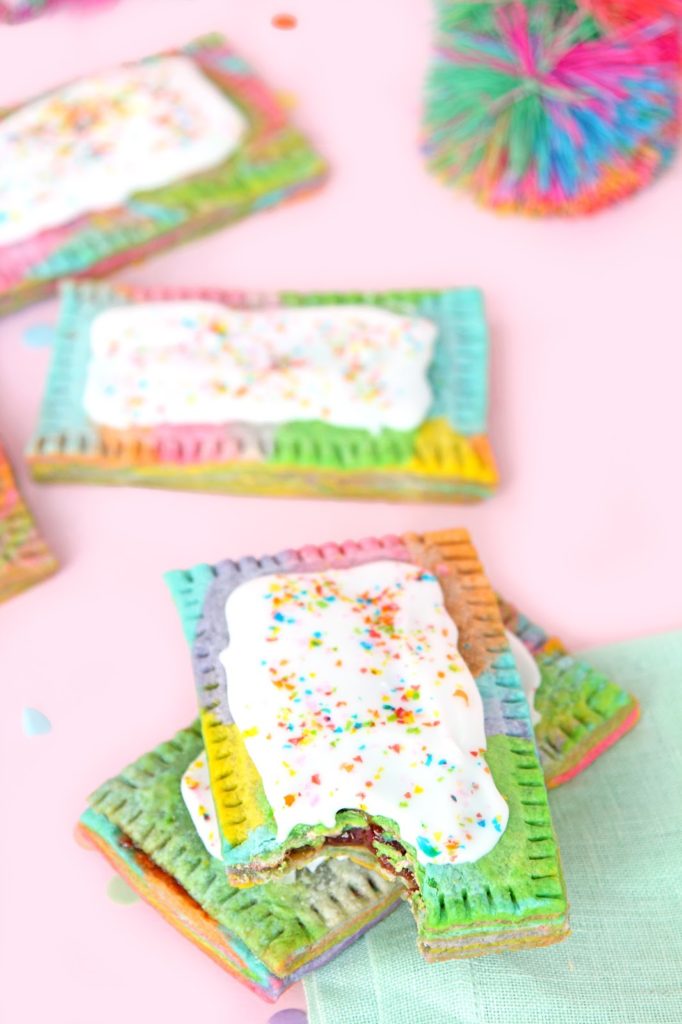
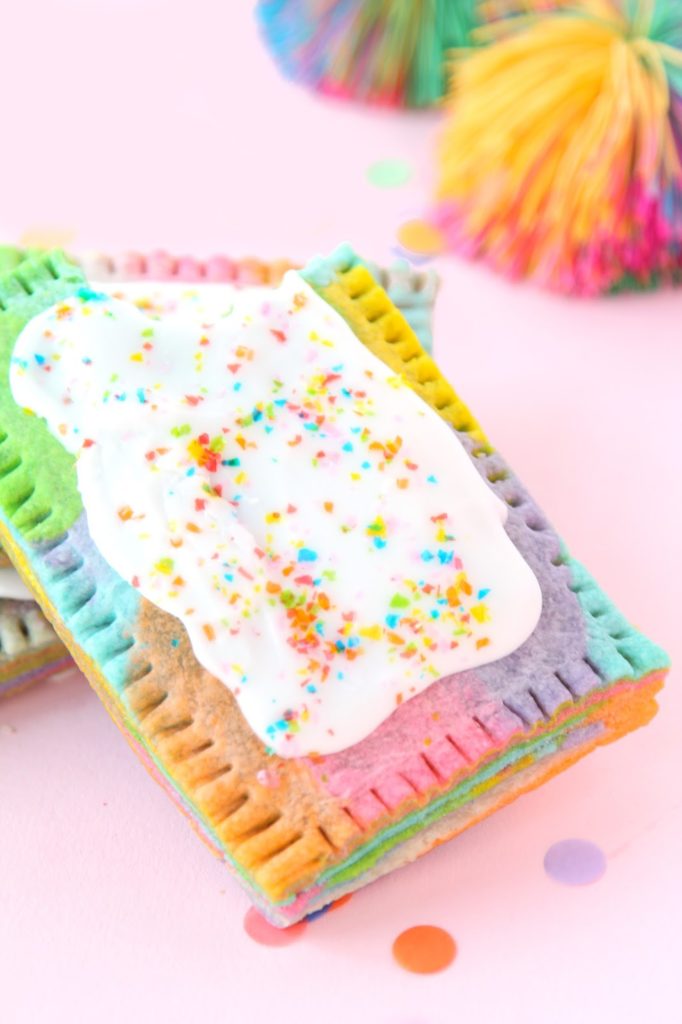
Happy Wednesday! Hope everyone is having a great week and are finally getting over our food coma’s from last week’s Thanksgiving meal. Now one of my favorite treats as a kid was a strawberry pop tart. I was the kid that didn’t toast it in the toaster oven I ate it straight from the bag and I loved it. I recently have seen a bunch of amazing pictures on instagram of bakeries making their own homemade versions of pop tarts. Needless to say they all looked amazing and I wanted to learn how to make one for myself. Thanks to Tastemade they recently posted a rainbow pop tart recipe and it looks unreal!

Ingredients:

Pop Tart Dough:

-2 ½ cups all-purpose flour

-1 tsp salt

-1 tsp sugar

-1 cup cold unsalted butter, cut into cubes

-¼ – ½ cup cold water

-pink, orange, yellow, green, blue and purple food coloring

Filling:

-any jam of your choice (I personally love strawberry)

Glaze:

-3 tbsp whipping cream

-½ tsp vanilla extract

-½ cup confectioner’s sugar

-rainbow sprinkles

Directions:

  1. First make the dough. Mix together the flour, salt and sugar in a food processor. Add butter and pulse until it turns into a crumbly meal-like texture. Drizzle over the ice water, and pulse until the dough sticks together when squished together.
  2. Divide the dough into 6 balls and dye each ball a color of the rainbow with food coloring. Flatten each ball of dough into a disk and stack them up in the order of the rainbow. Twist together, then divide in half, wrap in plastic wrap and refrigerate for 1 hour.
  3. Roll the dough out into a rectangle 10in x 8in.
  4. Cut into 4 rectangles and transfer to a baking sheet lined with parchment paper.
  5. Dollop 1 tsp of jam onto the center of one side of each rectangle. Fold the rectangle over to cover the jam and seal closed with a fork.
  6. Bake at 400F for 20 minutes, then transfer to a wire rack and fully cool.
  7. Now the frosting. Combine the whipping cream and vanilla extract in a bowl. Add the confectioner’s sugar and whisk until fully combined.
  8. Spoon some glaze onto each pop tart and decorate with rainbow sprinkles.

Hope you all enjoy this Hump Day Treat!

Tastemade Website with full recipe


FacebookTwitterPinterest

Leave a Comment
Filed Under: Lifestyle Tagged With: Hump Day Treat, november, Pop Tart, Rainbow Pop Tart, recipe, Tastemade, Wednesday

Hump Day Treat! Thanksgiving!

November 23, 2016

maxresdefault

It’s Wednesday so you know what that means? Hump Day Treat! Today since it is the day before thanksgiving I wanted to share some of cute ideas for kid friendly themed thanksgiving treats. Thanks to the facebook page Tastemade I found this adorable video that gives you some great ideas for kids.


Acorn Kisses

Ingredients:

Mini Chocolate Chip

Hershey Kisses

Mini Vanilla Wafers

Directions:

1.Melt a small amount of chocolate chips

2.Use some melted chocolate chips and put a dab on side of the wafer and press a mini chocolate chip on it

3.Use some chocolate frosting and put a dab on the opposite side of the wafer and stick the hershey kiss on it

4.ENJOY!

Pilgrim Hats

Ingredients:

Fudge stripe cookies

Mini reese’s cups

Melted white chocolate chips

Orange food coloring

Directions:

1.Melt some white chocolate chips and add a few drops of orange food coloring in it

2.Place the fudge stripe cookie with the fudge facing upward then place the reeses peanut butter cup upside down to cover the hole from the cookie

3.Then take the orange melted chocolate and pipe around the reese’s cup in order to seal it to the cookie and add a little decoration for the hat

4.ENJOY!

There are more ideas courtesy of this video from Tastemade. Check it out now incase you want to make some of these tasty treats tomorrow <3

Tastemade

(image taken from google)


FacebookTwitterPinterest

Leave a Comment
Filed Under: Lifestyle Tagged With: Acorn Kisses, Holiday, Hump Day, Hump Day Treat, Kid Friendly, november, Pilgrim Hat, recipe, Thanksgiving, Treat, Turkey Day, Wednesday

Hump Day Treat: Banana Bread

November 16, 2016

banana-bread-2

Happy Wednesday! Today’s Hump Day Treat is one of my favorite recipes thanks to my Mom. My Mom is known for her cooking amongst all of our family and friends, but if you ask any of my friends this is one of their favorite treats that she would make for us when we had some left over bananas. Now if you want to make banana bread one of the main things you need to remember is you don’t need to use super old bananas, but it does help when they are a little bit brown on the outside. You can also make this recipe into banana muffins or keep it as the traditional loaf of banana bread. Here is what you will need:

Ingredients:

1 cup of sugar

½ c ( 1 stick) unsalted butter

3 very ripe bananas, mashed

2 eggs, well beaten

1 tsp. Vanilla

1 ¼ c. all purpose flour

1 tsp. Baking soda

½ tsp salt

Directions

1.Preheat oven to 350 degrees

2.Put the sugar and butter and butter together and mix it well in a mixing bowl

3.Add bananas, eggs and vanilla.

4.Blend well all the ingredients

5.Sift flour, baking soda and salt together

6.Add to mixture and stir thoroughly

7.Pour into greased 8 x 4 inch loaf pan

8.Bake approximately 70 minutes until toothpick comes out clean

9.Remove from pan

10.Cool completely on cooling rack before slicing

Hope everyone enjoys this delicious treat! <3

(image taken from google)


FacebookTwitterPinterest

Leave a Comment
Filed Under: Lifestyle Tagged With: Banana, Banana Bread, Banana Muffin, Fall, Hump Day, Hump Day Treat, november, recipe, Treat, Wednesday, Winter

Hump Day Treat: Spagbog

November 9, 2016

unnamed-13

Happy Wednesday! It’s time for a hump day treat recipe to help everyone after last night’s election. Now there are some recipes that I use over and over again and this is one of my favorites. When making bolognese sauce there are many combinations that you can use. You can use ground turkey, ground turkey with lamb, ground meat with veal or pretty much anything you can really think of. I personally like using ground turkey but it’s all up to personal preference.

Ingredients:

1 onion

1 package of ground meat of your choosing

1 can of tomato sauce

1 can of tomato paste

1 package of mushrooms

Olive oil

Salt & pepper

1 large frying pan

Directions:

1.Cut onion into cubes and sautee with olive oil until they start to yellow

unnamed-6

2.Cut up Mushrooms and add them into the pan with the onions

unnamed-7

unnamed-8

3.When the veggies are softened, add meat in chunks. Flip and move around until meat is fully browned and break into smaller pieces

unnamed-9

4.Add salt/ pepper as the meat is cooking

unnamed-10

5.Add ¼ cup of Red Wine (This is an option step that I have done in the past, but the bolognese still tastes great without it)

6.Add tomato paste (full mini can); mix it around

unnamed-11

7.Add tomato sauce. You want it so that it’s a sauce consistency and not sloppy joe consistency

unnamed-12

8.ENJOY!

I personally pair this with Banza chickpea pasta with garlic bread and a vegetable. Banza and now have spaghetti style pasta that I just tried the other night with my best friend Randi and it is amazing! She couldn’t get enough of it. Hope you all enjoy <3


FacebookTwitterPinterest

Leave a Comment
Filed Under: Lifestyle Tagged With: Banza, Bolognese, Bolognese Sauce, Chickpea, Chickpea Pasta, Hump Day, Hump Day Treat, november, recipe, Sauce, Spagbog, Spaghetti Bolognese, Wednesday

Hump Day Treat – Southwestern Chicken Casserole

November 2, 2016

unnamed-3

unnamed-4

Happy Wednesday Everyone! I have seen so many of my friends recently starting to share their cooking creations via snapchat and I love it because now I can ask them all for their recipes. One of my friends Lauren snapchatted this delicious southwestern chicken casserole and I immediately texted her for the recipe. I know when people think of casseroles they immediately think “ew it’s just a hodge podge of a bunch of stuff”, but this casserole looks and tastes delicious! Hope you all enjoy it!

Ingredients:

½ small onion, chopped

2 cups cooked chicken (shredded)

1 ½ cups cooked brown rice

1 (15 ounces) can black beans (drained and rinsed)

1 (10 ounces) can diced tomato and green chili blend (drained)

¾ cup unsweetened almond milk

2 eggs (beaten)

1 cup reduced fat shredded mexican cheese blend

1 teaspoon cumin

½ tablespoon chili powder

½ teaspoon garlic salt

Salt & pepper ( for taste and personal preference)

Directions:

1.Preheat oven at 350 degrees F

2.Coat casserole dish with nonstick cooking spray

3.In a large bowl, combine all the ingredients

4.Pour mixture into a casserole dish and bake for about 25 minutes or until center is firm

5.Let cool for 5- 10 minutes and serve with desired garnishes

6. ENJOY!


FacebookTwitterPinterest

Leave a Comment
Filed Under: Lifestyle Tagged With: Casserole, Chicken, Chicken Casserole, Hump Day, Hump Day Treat, recipe, Southwestern Chicken Casserole

Hump Day Treat: Halloween Themed

October 26, 2016

14612611_1814070552178919_2455011773374800816_o

14691261_1814070258845615_6947406280627805069_o

Happy almost Halloween everyone! In honor of the upcoming holiday I thought what better way to honor today’s hump day treat recipe then have it be halloween themed. One of my favorite things about halloween is obviously the candy, but as a kid I always was searching for the house with the best stash. I am sucker for anything that has M&M’s in it because they are honestly one of my favorite candy.  Here is a a really cute and easy recipe complements to Tasty from Buzzfeed that incorporates M&M’s.


Ingredients:

½ cup of butter

4 cups of marshmallows

8 cups popcorn popped ( regular no flavor)

1 package of M&M’s chocolate the harvest blend (you can honestly do any flavor you want)

1 cup white chocolate

1 cup dark chocolate

1 teaspoon orange food coloring


Directions:

  1. Put the package of M&M’s in the freezer for 15 minutes so they can be firm before using.
  2. Melt butter over medium heat. After the butter is melted add the marshmallows. Stir constantly until all of the marshmallows are melted. After remove from heat.
  3. Fill a large mixing bowl with the popcorn. Pour the melted marshmallow mixture over the popcorn and mix around with a spatula gently!
  4.  Add the M&M’s and continue to mix gently with a spatula
  5. Take a cookie sheet and grease it or you could also use parchment paper and grease that over a cookie sheet if you’d like.
  6. Apply a thin layer of cooking spray or oil to your hands and grab a handful of the popcorn mixture. Gently form into a ball and place on the cookie sheet. (Repeat this step until all the mixture is gone)
  7. Place the popcorn balls into the refrigerator for at least 15 minutes to set.
  8. Melt dark chocolate. Once cool spoon into a small ziplock plastic bag.
  9. Melt White chocolate. Stir in food color evenly. Once cool spoon into a small ziplock plastic bag.
  10. Remove popcorn balls from refrigerator
  11. Snip the corner of the dark chocolate bag to create a spout and drizzle evenly over the popcorn balls. Repeat with the white chocolate.
  12. Return to the refrigerator for at least 30 minutes to set chocolate
  13. Then place in cupcake tins if you wish and on a serving tray and ENJOY!

Images taken from Tasty from Buzzfeed


FacebookTwitterPinterest

Leave a Comment
Filed Under: Lifestyle Tagged With: Buzzfeed, Buzzfeed food, Chocolate, Halloween, Hump Day, Hump Day Treat, M&M, Marshmallows, Popcorn, recipe, Tasty from Buzzfeed, Treat

Hump Day Treat: In Honor Of My Birthday On FRIDAY!!!

October 19, 2016

cuppup-header-1024x500

It’s Wednesday so you know what that means? Time for another Hump Day Treat recipe to share with all of you. My 27th birthday is this Friday, October 21st (CRAZY!!) so I wanted to share with you one of my favorite guilty pleasure recipes in honor of my birthday. One of my favorite things to make in college was something called puppy chow. NowI know what you all are thinking it sounds like dog food, but it’s honestly amazing and super easy to make. So When I when I stumbled upon this recipe for cupcake puppy chow from getinmybelly.com I knew I had to share it with you all. I personally like to keep my puppy chow in the freezer until I am ready to serve it, but that is entirely up to your personal preference. Here is what you need:

Ingredients:

  • 4.5 cups rice chex cereal (I normally use a full box)
  • ¼ cup salted butter
  • 3 tbsp heavy cream
  • 10 oz white chocolate candy melts or pure white chocolate
  • 1 tsp almond emulsion or extract
  • 1 tsp butter emulsion or extract
  • 1 and ½ cups powdered sugar

Directions:

  1. Pour cereal into a large mixing bowl
  2. In a medium sized sauce pan on a low heat melt the butter, cream and white chocolate. Stir constantly until all of the white chocolate is melted
  3. Remove the mixture from the heat and stir in the almond extract and butter extract
  4. Pour the warm white chocolate over cereal and stir well. I have in the past made the mistake thinking I could use my hands but then burned them so be careful
  5. about  3-4 minutes later no longer than that gently mix in the sprinkles.The last thing you want is for the sprinkles not to adhere to the chocolate but also lose their color
  6. In a large ziplock bag put some powdered sugar in it then pour half the cereal in the large bag or container. Personally I split the cereal with powdered sugar into two bags and then also pour extra powdered sugar on top.
  7. Close the bag and shake until the cereal is coated with the powdered sugar
  8. Place in the freezer until cold
  9. Take out of the freezer and enjoy!!

Hope you guys love this recipe as much as I do. For a full video of it head to Getinmybelly to watch it!


FacebookTwitterPinterest

Leave a Comment
Filed Under: Lifestyle Tagged With: Birthday, Cupcake, Cupcake Puppy Chow, Hump Day, Hump Day Treat, Puppy Chow, recipe

Hump Day Treat: In Honor of Yom Kippur

October 12, 2016

Noodle Kugel

Noodle Kugel

Happy Wednesday everyone! Fun Fact for everyone on this date in 2002 was my bat mitzvah! Crazy that it has been 14 years since that day and this year it falls on Yom Kippur. For all those who celebrate this holiday like me today is the day we fast, but at the end of the day we have a big meal. For today’s hump day treat I wanted to share with you one of my favorite recipes that my mom passed down to me which is my grandmother’s noodle kugel recipe. Now everyone has their own take on doing noodle kugel, but I personally don’t like it with cottage cheese or anything else in it. I also love it when the top of the noodles are a little crispy from cooking in the oven.

Ingredients:

2 eggs

4 TBLS of Sugar

1/4 TSP Salt

1/2 TSP Cinnamon

1 cup grated apples

1/2 cup of raisins

4 cups of cooked and drained noodles (Mueller’s Wide Egg Noodles)

5 TBLS Melted Butter

Baking dish (Preferably a pyrex glass one that you would use to make brownies)

Directions:

  1. Preheat the oven to 400 degrees
  2. Cook the egg noodles and drain them. After draining the noodles leave them aside in a mixing bowl
  3. Beat eggs, sugar,, salt and cinnamon together
  4. Stir in the apples and then the raisins
  5. Then take the mix and pour it over the noodles and mix it all together
  6. Take your baking dish and coat it with butter so it doesn’t stick
  7. Pour the mix into the pyrex
  8. Personally I love to add on the top some more cinnamon and a pinch of cinnamon sugar in order to cover the entire top (some of my friends like to add corn flakes for some crunch)
  9. Place in the oven and cook for 40 minutes or until brown

Hope everyone who celebrates had an easy fast!

(image taken from google)


FacebookTwitterPinterest

Leave a Comment
Filed Under: Lifestyle Tagged With: Hump Day, Hump Day Treat, Noodle Kugel, recipe, Yom Kippur

Hump Day Treat: Sugar Cookie Fries

October 5, 2016

gallery-1474666959-delish-cookie-dough-fries-pin-03

Its Wednesday which means it’s time for another Hump Day Treat from #ChefJodi. Anyone that knows me knows that I love cookies and I am always looking for a new take on a cookie recipe. I found these delicious sugar cookie fries from delish.com while searching on facebook and they are exactly what I was looking for. They are such a cute and unique spin, in terms of presentation, of the traditional sugar cookie way.

Side note: If you are looking for french fry boxes you can find them in any cooking store or even online like these ones that I found on Amazon. Just to add a little something to your presentation. Hope you guys enjoy this new and fun take on the classic sugar cookie!

French Fry Box Via Amazon

Ingredients:

  • 2 Sticks unsalted butter, softened
  • 1 c. granulated sugar, plus more for sprinkling
  • 2 large eggs
  • 2 tsp. vanilla extract
  • 3 c. all-purpose flour
  • 3/4 tsp. baking powder
  • 1/2 tsp. salt
  • Funfetti frosting, for serving
  • Strawberry jam, for serving
  • Nutella, for serving

(If you have other dipping choice options you like, the more the merrier!)

Directions:

  1. Preheat oven to 350 degrees F. Line two large baking sheets with parchment paper.
  2. In the bowl of stand mixer, beat butter and sugar until light and fluffy. Add eggs, one at a time, until evenly incorporated. Beat in vanilla. Add flour, baking powder and salt and mix on low until just combined.
  3. Divide dough into 2 balls and flatten into discs. Refrigerate for 1 hour.
  4. Roll out dough into a large, thin rectangle. Using a pizza cutter (or sharp knife) cut dough crosswise into 3/4″-1″ thick strips. Cut the strips in half lengthwise and trim the edges to create straight sides. Sprinkle with sugar and transfer cookie cutouts to baking sheets. Let chill in the refrigerator for about an hour.
  5. Bake for 12-15 minutes, until the cookies are starting to turn golden around the edges. Let cool completely.
  6. Serve with desired dipping sauces.

ENJOY!

Full Recipe from Delish

images taken from google


FacebookTwitterPinterest

Leave a Comment
Filed Under: Lifestyle Tagged With: Hump Day, Hump Day Treat, recipe, sugar cookie, sugar cookie fries

Hump Day Treat: Eggplant Pizza

September 28, 2016

sub-buzz-8847-1471890040-2

Its Wednesday so it’s time for some hump day treats! One of my favorite things to get at an Italian restaurant is eggplant parm. I have honestly never had a bad eggplant parm from anywhere I have been to in my entire life, but I was always curious was there another way I could get the same taste of eggplant parm without having to coat it in breading? The answer is YES! There is another option and it is called Eggplant Pizza. Who would of that this was possible? Once again thanks to Tasty on Buzzfeed they have given me the perfect recipe to create this. Here is also a video of it being made which is sometimes helpful to see someone do it themselves. Eggplant Pizza

Ingredients:

1 jar of classic tomato sauce

1 large globe eggplant

Salt

Olive Oil

2 cups mozzarella cheese

1 cup cheddar cheese

Directions

1. Preheat oven to 350°F/180˚C.
2. Slice the eggplant into ½-inch pieces. If you want to make them a little thicker or thinner totally up to your personal preference.
3. Salt the slices and leave them to “sweat” for 20 minutes then wipe them off. Use a paper towel to wipe them off rather than a kitchen towel.
4. Slather each slice with olive oil. You can do this with also a cooking brush if you don’t want to get your hands all greasy.
5. Bake for 25 minutes.
6. In a medium bowl, combine all pizza sauce ingredients and stir until its all mixed together.
7. Remove eggplant slices from the oven and pour about 2 tablespoons of the sauce mixture onto each slice.
8. Sprinkle mozzarella and cheddar on each slice.
9. Put the slices back in the oven for 1-2 minutes to melt the cheese.
10. Allow to cool before serving. Last thing you want to do is burn the roof of your mouth. OUCH!

Hope you all Enjoy!

(image taken from buzzfeed)


FacebookTwitterPinterest

Leave a Comment
Filed Under: Lifestyle Tagged With: buzfeed, eggplant, eggplant pizza, Hump Day, Hump Day Treat, pizza, recipe, Tasty on buzzfeed

  • « Previous Page
  • 1
  • 2
  • 3
  • 4
  • Next Page »

Social

  • Facebook
  • Instagram
  • Pinterest
  • Twitter

Archives

Site design by Aubrey Kinch Design Studio & development by Olive & Ivy Design