• Home
  • Categories
    • Beauty
    • Fashion
    • Lifestyle
  • Steals & Deals
  • About Me
  • Contact

Just Jodi Style

Hump Day Treat: S’mores Dip

April 20, 2016

buzzfeed : instagam s'mores pic

Happy Wednesday!!! Today’s hump day treat is one of my favorite things from my childhood: s’mores! Now, I am always up for mixing things up even with something so classic, traditional and easy as a s’more. The new thing that everyone is doing is s’mores dips! It is an easy way to make something fun for when you have some friends over and also for some of us who aren’t fortunate enough to have access to  a campfire or even a fireplace to roast our marshmallows.


Ingredients:


  • 1 package of Nestles toll house semi sweet morsels ( you can also use Hershey kisses if you want)
  • 1 package of marshmallows
  • 1 box of graham crackers
  • 1 skillet or oven safe pan
  • Pam baking spray


Directions:


  • Preheat oven to 450 degrees. While oven is preheating get all of your ingredients together.
  • Spray your pan with pam baking spray (this is something that I do lightly just so that it’s an easier clean up)
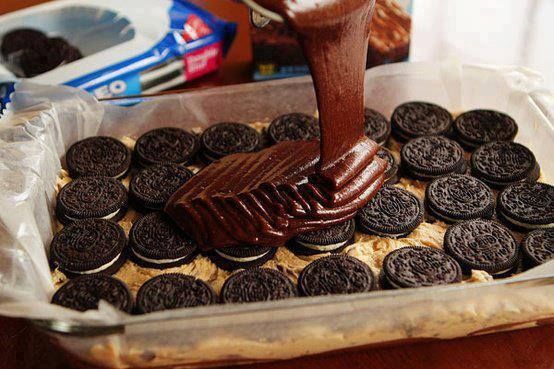
  • Pour the chocolate chips or Hershey kisses into skilled or oven safe pan. Make sure the entire bottom of the pan is covered with chocolate
  • Cover the chocolate chips with the marshmallows. If anyone does the marshmallows for thanksgiving you know that marshmallows expand so no need to make sure that they are precisely touching each other just that you don’t see a lot of chocolate from above.
  • Place the skillet or oven safe pan into the oven for 8 – 10 minutes
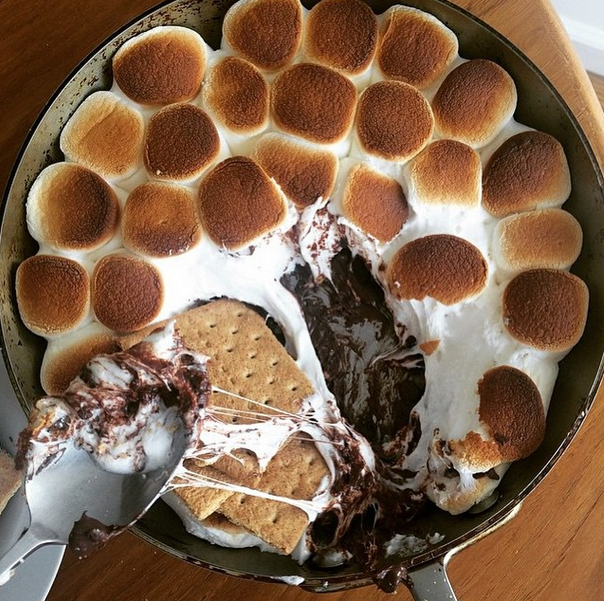
  • Remove from the oven when the marshmallows are toasty brown
  • Wait about a minute as you don’t want to burn yourself but place ontop of something on the table  in order to serve while hot
  • Open the graham crackers and dunk to your hearts content!

ENJOY!

(image from Buzzfeed)


FacebookTwitterPinterest

Leave a Comment
Filed Under: Lifestyle Tagged With: Buzzfeed, Buzzfeedfood, Hump Day, Hump Day Treat, S'mores, S'mores Dip

Ray-Ban: Foldable Aviators

April 19, 2016

160320-ASHarris-Jodi_Style-8213-LOOK6

Hi Everyone! First I want to apologize for not posting yesterday I am currently in California until the end of this month for one of my oldest friends’ weddings and one my good friends bachelorettes so all the activities got the best of me this weekend.  Today I wanted to talk about sunglasses and not just any sunglasses but foldable sunglasses. I am one of those people that always seemed to, some way or another, break my sunglasses on multiple occasions. While I am traveling, I  hate to carry the big bulky sunglass cases so I would try and use a soft case for my sunglasses but that was always when I seemed to break them. My brother came home one spring break and showed me his amazing foldable Ray-Ban “wayfar” sunglasses that he got and he also showed me the slim case that it came with. The case for them is so small it even fit nicely in his shorts pockets.  That summer I was going to Israel with him and I did not want to break another pair of sunglasses again. When I went into my local eye-glass store I was pleasantly surprised that the foldable Ray-Ban’s also came in the aviator style! My brother was also happy because he didn’t want me to buy a matching pair ☺ . It has not even been 3 years later and I still have my foldable Ray-Ban aviators and I will not travel without them. They of course, like any pair of sunglasses, have a few scratches here and there, but other than that I have no issues with them. Today they have more options for foldable pairs on the Ray-Ban website and you can even customize your own pair! I highly suggest if you are looking for a great pair of sunglasses to have in your bag whether you are traveling or just looking for a great everyday pair you should invest in a pair of foldable Ray-Ban’s ASAP!


FacebookTwitterPinterest

Leave a Comment
Filed Under: Fashion Tagged With: Aviator, Foldable, Ray-Ban, Sunglasses

Steals & Deals: Daym Jodi Back at it with the White Shoe

April 15, 2016

160320-ASHarris-Jodi_Style-8258-LR-UNEDITED 160320-ASHarris-Jodi_Style-8261-LR-UNEDITED 160320-ASHarris-Jodi_Style-8264-LR-UNEDITED

Daym Jodi! Back at again with the white shoes! Today’s steals and deals post, if you haven’t already guessed, is about the infamous white sneaker. After those two kids from California started those snapchats with the white vans I can’t stop seeing people wearing white sneakers everywhere! I know that everyone loves the Stan Smith Adidas sneakers, but when I was looking for the perfect white sneaker I wanted something that I hadn’t seen all my friends wear. These white sneakers I am wearing are from Kenneth Cole. Yes I know exactly what you are all thinking: who would have thought that Kenneth Cole made cool sneakers? I didn’t! I saw these and instantly fell in love because I didn’t want to have a bright color on my shoes, but I still wanted a little detail on them that made them different. These silver detailing on the back of the shoe was the perfect amount for me. They are also aren’t that much more money than the Adidas pair. They are only $120 and are genuine leather. If you look on their website the back detailing looks gold from the images, but in person they are more silver than gold. I wear mine almost everyday when it is nice out and I never want to take them off. If you are discouraged to buy the famous white sneaker because of the fact that they do get dirty quicker than other shoes, don’t be. When I want to clean my shoes I use the famous Mr. Clean “magic eraser.” It gets off all the dirt and scuffs from my shoes in an instant and keeps them looking pearly white ☺ . If you are looking for other alternative options check out some other great pairs I have below from Nordstrom. Again, I can’t say this enough, make sure that you are comfortable with whatever shoe you purchase because the last thing you want is to be wearing sneakers that ultimately hurt your feet. Good luck with the search!!


FacebookTwitterPinterest

Leave a Comment
Filed Under: Steals & Deals Tagged With: Ed by Ellen, Kenneth Cole, Nike, Vans, White Shoe, White Sneaker

Coachella 2016

April 14, 2016

Coachella 2016

This weekend marks the start of the infamous music festival: Coachella! Going to school in Arizona a lot of my friends would go because it was an easy drive there, but sadly I was always too late to get a ticket to it. When it comes to music festival attire the thing that is most important is longevity.  A few years ago, I went to Gov Ball on Randall’s island and I knew I was going to be out there all day, but I didn’t expect that it was going to be as hot as it was. Remember: whatever you need you will have to carry with you all day at these music festivals and  the merchandise they are also selling on site are obviously marked up tremendously. So it is better to be prepared. First off, wear sneakers because the last thing you want is to come home after a day of wearing sandals or open toe shoes to have your feet be covered with dirt. Secondly, bring something to sit on when you are there, whether it be a little towel or a jacket that you don’t care about, because there are no seats anywhere at these events. Thirdly, bring something for the night time whether it be a scarf or jacket because one thing that nobody tells you is when night falls at these music festivals, it gets chilly.  Obviously you don’t want to be wearing a long sleeve shirt all day, but you also don’t want to freeze during the night time. A lightweight scarf is the best go to thing to have because it can be folded up in your purse or backpack and not take up as much space as a jacket. Last but not least, you have to keep hydrated! A lot of these music festivals have free water bottle filling stations and you should use these as much as possible. Bring a refillable water bottle with you and even when you aren’t thirsty just keep drinking. The last thing you want is to get heat stroke or be dehydrated. Have a great time Coachella go-ers stay safe  and make sure to cover up with some sunscreen!


FacebookTwitterPinterest

Leave a Comment
Filed Under: Fashion Tagged With: Donni Charm, grlfrnd denim, Joie, Lululemon, Mango, Nordstrom, Revolve, S'ip, Swell, Target

Hump Day Treat: Lobster Mac n Cheese

April 13, 2016

8e7e13a7-2839-43dd-b6fa-f2d33fcab417 1912f51d-a442-4f7d-b15c-2aca145499ce d1488aa1-04fc-45bb-b23a-3bc09ac64441

Today’s hump day treat is Lobster Mac n Cheese. Everyone who knows me very well knows that I love mac n cheese. It is my kryptonite in the sense that if I see it on a menu, I absolutely have to order it 99% of the time. Not until I was older when I started to like things like shellfish did I discover the infamous lobster mac n cheese. Today I am taking a classic recipe from one of my favorite restaurants in Miami Barton G and giving it a little twist. Depending on if you want to make your own lobster these are the ingredients you will need.


Ingredients:

½ cup white cheddar cheese

½ cup Vermont yellow cheese

½ cup velveeta cheese

¼ cup of boursin cheese

¼ cup parmesean

¼ heavy cream

½ cup of milk

½ cup of butter or margarine

1 box of macaroni noodles

Lobster – package of pre cooked lobster or 2 fresh lobster tails from the store

One large baking dish ( pyrex)


Directions for cooking lobster

If you are going to cook your lobster the general way to do it is as follows. Bring 6 cups of salted water to a boil in a 3-quart saucepan. Once the water is really boiling add the lobster tails into the pot. Cook the lobster tails for about 8 – 12 minutes or until the shells turn bright red and the meat is tender when you poke it with a fork. After they look cooked take a pair of tongs and take them out of the water and onto a cutting board. Let them cool for at least 20 minutes. Once they are cool, you can put a paper towel over them and use the side of the knife to help crack its shell.  Then you will just dice up the lobster into little pieces and put it in a side bowl for later.


Directions

  1. Preheat the oven to 350 degrees
  2. cook the macaroni noodles according to the box and have them ready to go in the pasta strainer
  3. in a large bowl mix all of the various cheeses ( I personally don’t use the boursin cheese because I don’t like the taste, but if you like the taste of it then add it ☺)
  4. once all the cheeses are mixed well then add the cooked noodles in while mixing
  5. Add the heavy cream and milk and continue to stir
  6. Coat the large baking dish with the butter and make sure it covers all the edges
  7. Add half of the cooked lobster that you had previously chopped into little pieces and mix it in as well
  8. After thoroughly mixing everything in the bowl pour it into the buttered baking dish
  9. Garnish the top of the noodles with additional cheese and lobster to make sure that no piece is left untouched
  10. Bake for 45 minutes or until golden brown

Enjoy!!

(images are taken from google)


FacebookTwitterPinterest

Leave a Comment
Filed Under: Lifestyle Tagged With: Barton G, Lobster Mac N Cheese

The Perfect Wedding Clutch: Edie Parker

April 12, 2016

160320-ASHarris-Jodi_Style-8133-LR-UNEDITED 160320-ASHarris-Jodi_Style-8122-LR-UNEDITED 160320-ASHarris-Jodi_Style-8125-LR-UNEDITED

Wedding season is here and I have discovered that no matter how hard I try, I needed to get a little wedding clutch to go with all of my outfits. Despite the fact that most of these small bags do not fit pretty much anything let alone lipstick, I have come to discover the few bags that actually are practical. These Edie Parker clutches are becoming staple pieces in everyone’s closets including celebrities on red carpets. I was lucky enough that a friend of mine was invited to the secretive Edie Parker sample sale in NYC and I begged her to get me a bag while she was there. Thankfully, she was able to snag me these two bags. I wanted to get two different sizes and also one that went with gold jewelry and one that went with silver. The great thing about these bags is, that inside when you open them up there is a mirror on one side of the bag. To any girl, that is huge because sometimes the lighting in a bathroom isn’t the best and you just want to quickly touch up your make up. These bags are worth every single penny because even if they get a little scratch on them you can’t even tell! They also have a great option on their website where you can customize you own clutch. I have seen a lot of new brides get this from their new husbands as the first item that has their new name on it ☺ which is very cute. If you aren’t looking to spend a ton of money on an evening clutch, my suggestion is to get a hard sided one because they last longer than the soft-sided ones and the worst thing then spending money on a bag is having a bag look bad after only wearing it a few times. Also another suggestion is to get one that can work with every color palette. You don’t want to get one that only goes with that one dress to that one wedding you are planning on attending. Just like how I got two different Edie Parker bags based upon jewelry preference it really makes a difference!


FacebookTwitterPinterest

Leave a Comment
Filed Under: Fashion Tagged With: Clutch, Edie Parker

Rock Stud Flat

April 11, 2016

160320-ASHarris-Jodi_Style-8018-LR-UNEDITED 160320-ASHarris-Jodi_Style-8026-LR-UNEDITED

When it comes to spiked shoes the first thing you think of are the Valentino Rock Studs. Anyone who has seen these shoes know exactly what I am talking about. Every celebrity and model in the world has worn the infamous Valentino “Rock Stud” shoes, but since the inception of this shoe it has gone through some changes. There are now many versions of this now classic shoe. There is the classic sling back pump in both a shorter and taller heel, there are the booties with rock stud detailing, there is the classic ballet flat and also the ballet flat with straps! When I was graduating from graduate school this past may I wanted to get something for myself that I knew I would wear in the workplace.  If you ask anyone, I love heels, but when it comes to work I prefer to wear flats especially if I am going to be on my feet for an extended amount of hours. So I decided that the rockstud flats with straps were the best option for me. I always get nervous with ballet flats if they don’t have straps that eventually the shoe will become loose with wear.  Having the strap options ensures the shoes would stay on my feet. These shoes, are the most comfortable ballet flats ever! Normally shoes with a pointed toe are known for being uncomfortable because of the limited space in the front, but not with these shoes. I could wear these shoes for hours on end and my feet wouldn’t be bothered at all! When looking for ballet flats for the workplace, the first thing that you should be looking for is comfort. It doesn’t matter how pretty the shoes are, if they are not comfortable it is not worth it. Secondly, make sure they are appropriate for work in the sense that they aren’t too casual that they don’t look right with a fancy outfit. Small tip: If you aren’t going to wear ped socks with your ballet flats and are going barefoot in them, I would put a little bit of baby powder in your shoes. It helps when it comes to sweat (ew) and also to not get those pesky blisters ☺


FacebookTwitterPinterest

Leave a Comment
Filed Under: Fashion Tagged With: Ballet Flats, Rock Stud, Valentino

Steals & Deals: Pridebites

April 8, 2016

IMG_3830 IMG_4962

It’s Friday and you know what that means… It’s steals and deals day!! Today I want to talk about an amazing company called Pride Bites. Pride Bites was started by one of my brother Ira’s really good friends from college. When I got my precious toy goldendoodle I knew that I didn’t want her to just have any bed but I wanted her to know it was hers. For all of you pet lovers out there, Pride Bites’ toys are INDESTRUCTIBLE! You heard that right: their toys are indestructible! Even for the most unruly of pets, these toys survive. Every item on Pride Bites’ website is also able to be customized. You can even upload an image of your pet to put onto the items you customize. I got my puppy, Stella, a custom crate bed, bed, toy box, and placemat to go under her bowls and blanket. She absolutely loves all of them!!  Yes I may have gone a little overboard, but when you see the stuff you would too. Stella knew exactly when I put her bed down that it was hers and fell asleep on it right away.  I didn’t order her a custom toy until recently because I wanted her to grow into her puppy face. I just recently placed my order for a custom Frisbee toy with her face on it and I can’t wait to see how it turns out☺. The best thing about Pride Bites is that they have amazing customer service and did I mention that their items are so cute? They always give amazing coupon codes so if you spend $100 on their site at any time, you get $25 off your order with the promo code: 25NOW.  Tonight they are going on Shark Tank to try and see if the sharks bite to invest in their amazing company.If you love their toys get them now before they get backed up with orders!. I am not just saying all of this because my brother knows the owner, but I truly believe that their products are so unique and different, that everyone needs to go and check them out right now! You heard it hear first! Head on over to Pridebites.com and get all of your dog goodies<3 If you don’t already you all should follow my dog Stella on instagram @HowStellaGotHerWoofBack


FacebookTwitterPinterest

Leave a Comment
Filed Under: Steals & Deals Tagged With: ABC, Custom, Dog, Goldendoodle, Pridebites, Sharktank, Stella, Toy Goldendoodle

Micro Mini Handbag

April 7, 2016

160320-ASHarris-Jodi_Style-8035-LOOK1

This past year has been all about the micro mini handbag. Whether you saw Kendall Jenner carrying her baby Céline back or all of the editors walking with their mini bag to fashion week, it was and continues to beeverywhere! I knew if I was going to buy a micro mini handbag, regardless of the designer, it would have to be in a color that I would wear often. What color do I wear the most often when it comes to handbags? Of course the answer was clear: I would be looking for a black micro mini handbag. When I heard that Louis Vuitton was making their Alma bags in black monogram vernis leather I was hoping they would be making the small version, the Alma BB. Lucky for me they had it! The shape was classic and it wasn’t a regular leather bag that would show scratches on it very quickly.  I also loved that it came automatically with the cross-body strap for the bag. Sometimes with these micro mini handbags they don’t always come with the cross body strap and you have to purchase them separately. If you are already spending so much money on a bag why it doesn’t come with the strap is beyond me,and since this bag did I was ecstatic about it, this clearly was the right choice. This is now my go to bag for anything when I go out. It is not too small that I am trying to stuff all of my things for the night in and it is not too big that I feel like I am still carrying my everyday bag around when I go out  at night. It comes in a variety of colors and material options on their website. My suggestion if you are going to buy a micro mini handbag is, as I mentioned earlier, to go with a color that you know you wear a lot of. Also a general rule for this and for fashion,  don’t settle for a bag or item just to have one. It is worth the wait to get the bag and item you really want.


FacebookTwitterPinterest

1 Comment
Filed Under: Fashion Tagged With: Cartier, Louis Vuitton

Hump Day Treat! The Slutty Brownie

April 6, 2016

be4fe93463bb6af70a56704da7c5f563

For this week’s Hump Day Treat, I decided to share with you all one of my favorite new dessert recipes! Now we many of us have seen this recipe on Pinterest and all over Instagram, the so called “slutty brownie,” but here is my version of the slutty brownie.


Ingredients:

1 box of Ghiradelii brownie mix

1 package of Pillsbury cookie dough

1 package of regular Oreos

1 Pyrex 11×7 baking pan

Pam non stick baking spray


  • Preheat the the oven to 350 degrees.
  • Spray the pyrex pan with the pam baking spray
  • Layer the bottom part of the pyrex with the cookie dough. Flatten the cookie dough so it covers the whole bottom of the pan
  • After the cookie dough is all flat at the bottom of the pan you will now need to make the brownie mix. When I get this brownie mix I normally get it at Costco so I double up the packages to make it extra thick, but you don’t have to do that for this recipe. If you want to it still tastes just as yummy!
  • Now open the oreos up and put them into rows on top of the cookie dough. In the past I have done four oreos across and then just done as many as I could fit in the pan.
  • After the oreos are all lined up it is time to pour the brownie mix on top of the the oreos that is on top of the cookie dough. Make sure when you are pouring you go over the entire pan so that it is evenly distributed.


    1. Some people like to add sprinkles on top of the brownie mix once it has settled , which you can do as well, but I personally like to add toppings after it is cooked.


  • Bake in the oven for about 35 minutes then check with a toothpick if it is cooked through. I like cooking with a pyrex for this reason so you can see from the side if the cookies are made all the way through.
  • Take out of the oven once baked and let it cool in the pyrex on a cooling rack. Once cooled, cut and enjoy!!!

Hope you guys enjoy this hump day treat  ☺Slutty-Brownies

(Images were taken from popsugar and from google)


FacebookTwitterPinterest

Leave a Comment
Filed Under: Lifestyle

  • « Previous Page
  • 1
  • …
  • 19
  • 20
  • 21
  • 22
  • 23
  • Next Page »

Social

  • Facebook
  • Instagram
  • Pinterest
  • Twitter

Archives

Site design by Aubrey Kinch Design Studio & development by Olive & Ivy Design