• Home
  • Categories
    • Beauty
    • Fashion
    • Lifestyle
  • Steals & Deals
  • About Me
  • Contact

Just Jodi Style

Fitness Tuesday: The Right Support

September 27, 2016

160731-asharris-just_jodi-6576-look7-2

160731-asharris-just_jodi-6592-look7-2

160731-asharris-just_jodi-6607-look7

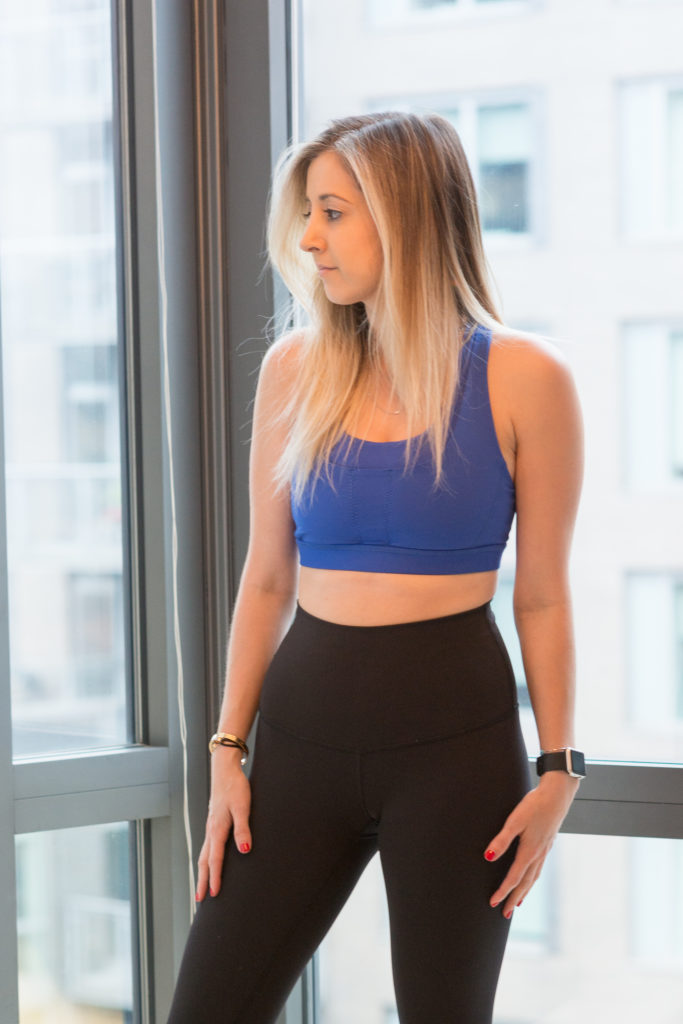
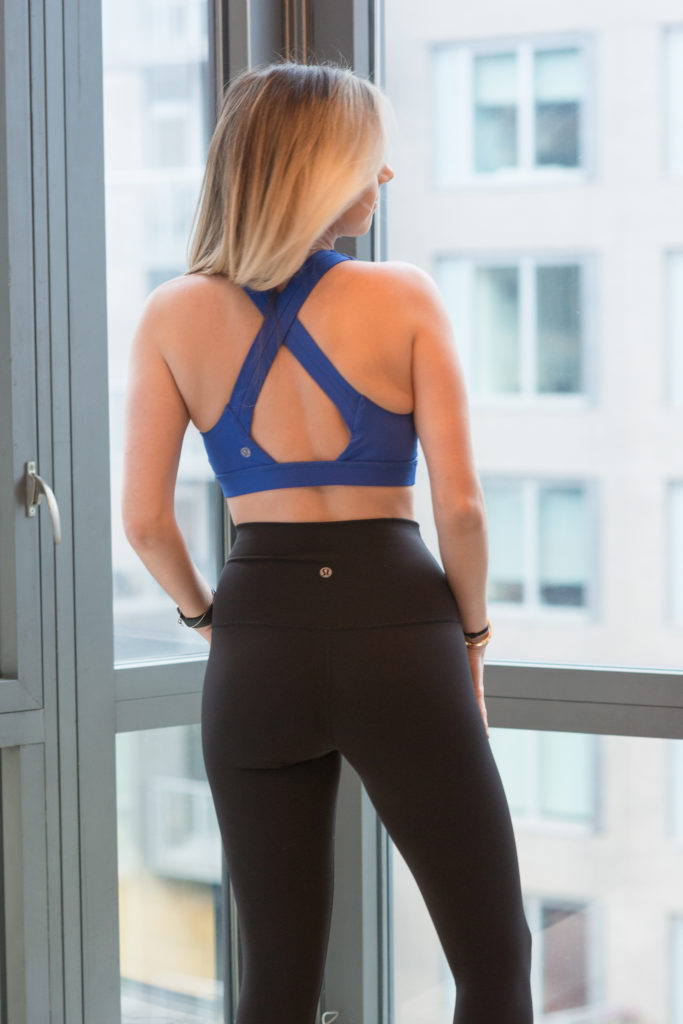
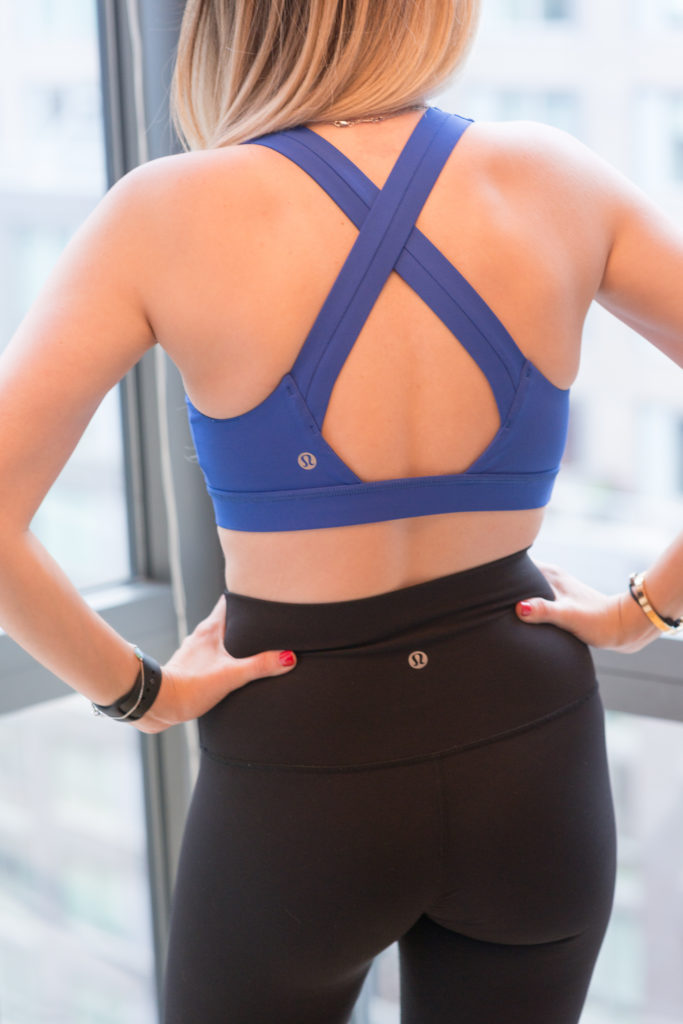
When working out the most important thing for any female is finding the right sports bra.Growing up I had a larger chest than most of my friends so even though I wanted to wear the “cool” sports bras that they were wearing I knew that it wasn’t going to be possible for me. As I got older I tried out probably every brand of sports bras that came out in hopes that it would fit me properly. One thing that is important when buying a sports bra is you want it to support you. you also don’t want to be moving around too much especially with different work outs because you will just feel the pain later. When lululemon came out I was skeptical of trying a lot of their sports bras because they seemed to be meant for women with smaller chests. However, recently they have come out with more styles and more variety in the sports bra department that I have found my perfect fit. With their sports bras, I personally take out the additional cup they add into it because they always seem to fall out when I wash them, but also they just annoy me when I am working out. If you can’t go to a lululemon store go online and buy a bunch of sizes. They have a great return policy and great customer service. Once you have figured out your size always look out for their “we made too much” section. A lot of times I have found my favorite sports bra there but in a different color pattern on sale in their “We Made Too Much” section and even though the pattern may not be my favorite who can say no to a discounted sports bra from lululemon? Head on over to lululemon’s website to see some of their amazing sports bras now!


FacebookTwitterPinterest

Leave a Comment
Filed Under: Lifestyle Tagged With: Fitness, Fitness Tuesday, Lululemon, Sports Bra, Support

Hump Day Treat: Cheesy Zucchini Sticks

September 21, 2016

maxresdefault

Happy Last Day of Summer Everyone! Anyone that went to college with me knows that I love cheese sticks especially the ones from Papa John’s. They come in what looks like a pizza pie and with many sides of dipping sauces. It is one of my weaknesses that if it is put in front of me I would not be able to resist, but I wanted to find an alternative way to have something that is similar but healthier alternative.  Thanks to Buzzfeed I found this amazing recipe for cheesy zucchini sticks.

INGREDIENTS

4 medium zucchini
⅓ cup parmesan cheese, grated
1 tablespoon garlic powder
1 teaspoon pepper
½ teaspoon red pepper flakes
½ teaspoon salt
1 large egg
⅓ cup cheddar cheese
½ cup mozzarella cheese

Directions
1. Preheat oven to 400ºF
2. Grate zucchini into a mixing bowl.
3. Transfer grated zucchini into a larger mixing bowl and add garlic powder, parmesan cheese, salt, pepper, red pepper flakes, and egg. Mix it all together.
4. Pour the mixture onto a small towel and wring the excess fluid from mix.
4. Place a piece of parchment paper on a baking sheet and spread mixture evenly into a square about a ½-inch thick.
5. Bake for 35-40 minutes or until middle has thickened.
6. Remove from oven and spread cheddar and mozzarella cheese over top .
7. Place back in the oven at 350ºF/175ºC for 10 more minutes or until cheese melts and is bubbling.
8. Let cool for 5 minutes, and enjoy with marinara, ranch, or any sauce of your choosing!


Here is a video of it being made step by step. Hope you all enjoy!

(image taken from google / buzzfeed)


FacebookTwitterPinterest

Leave a Comment
Filed Under: Lifestyle Tagged With: Buzzfeed, Buzzfeed food, Tasty, Zucchini

Fitness Tuesday: Fhitting Room

September 20, 2016

fhitting_room_outside-e1430793667746 fhitting-room-flatiron-800x470-1430927115

I know that on Sunday I wrote about SoulCycle and my love for doing spin classes, but I have decided that every Tuesday I am going to share some fitness tips and will be calling it Fitness Tuesday! Something that my brother Ira has taught me about working out (he is my gym inspiration) he said that you need to make sure that you switch up your workouts. I spin at least 4 days a week, but in between spinning and doing cardio I try to add different work outs. My best friend Shayna told me about Fhitting Room back in July and I will admit I was a little scared to try it at first. Before I went to the class I obviously googled it and saw a video of one of the classes. I have done cross training type classes before, but not ones that involved this many circuits in one class. I reluctantly signed up for my first class and now I am hooked. I know a lot of people are concerned that especially in a group class like that you won’t get a lot of personalized attention especially since you want to make sure your form is right in order to not hurt yourself, but there is no reason for anyone to be worried! There are always two instructors in each class and they are constantly walking around checking everyone’s form. There have been times I have been screamed at in my face saying to keep going when I was at my breaking point, but they pushed me through it. I have been in the class with even women that are PREGNANT believe it or not and if they can make it through this class so can all of you. They give a deal to first timers where you get two classes for the price of one and then after those classes run out you can buy a 3 class pack at a lower rate. If you are in NYC and haven’t tried them out already you need to get yourself over to either one of their locations and try it out for yourself.

(images taken from google)


FacebookTwitterPinterest

1 Comment
Filed Under: Lifestyle Tagged With: Fhitting Room, Fitness, Fitness Tuesday

SoulCycle x Apple Watch

September 18, 2016

160731-asharris-just_jodi-6612-look7 160731-asharris-just_jodi-6616-look7

Today is Sunday so it should be a day of rest right? For me, I enjoy working out especially on Sunday’s because it makes me feel that my week ended on a high note. I have always loved working out and taking classes, but while I was home in Miami there wasn’t as many options as I would like. In New York, there are work out classes almost on every block, but I wanted to find something that was close to my home in Miami and also in NYC. I had tried SoulCycle in the past, but never got into it that much. I always thought it was just a fad and it would pass. Boy, was I wrong. I started to go when I was home since they opened a SoulCycle studio 10 minutes from my house. I figured why not get back into the gym slowly… Now I am addicted. I go a minimum of 4 days of week. It is addicting, but something that people may not realize is when you look at a SoulCycle schedule when it says SoulSurvivor that means the class is not the general 45-minute class it is an HOUR LONG, but for the same price! So why not go for an hour vs 45 minutes if you can? I try to go every Sunday for a SoulSurvivor class to just prepare myself for the week ahead. One of the things that I can’t go to class without is my apple watch. I have the first generation of the watch that my brother Ira gave to me as my graduation gift from Graduate School. I use this to track my workouts and even though sometimes it isn’t 100% accurate it has been really helpful through my workout journey. I have done the recent software update that came out this week for the watch and it has fixed a lot of the issues with my watch that I was having before. Another thing is if you have an apple watch just remember if your phone is nearby make sure to put your watch on sleep mode. It will still track everything to your phone, but from experience the last thing you want is your watch to start ringing on your wrist in the middle of class because someone is calling your cell phone. Happy Sunday Everyone!!


FacebookTwitterPinterest

Leave a Comment
Filed Under: Lifestyle Tagged With: Apple, Apple Watch, SoulCycle, Spinning

Frose: Frozen Rose

September 17, 2016

frose_big

Saturday’s are for having fun and spending time with your friends. Tonight I am going to watch with my friends one of the shows highlighting the JonBenet Ramsey case. One of my friends, who helped with the production of one of the many specials highlighting this case, has been working so many hours on this and we all decided we had to watch it together. So what better way to hang out with friends than to drink some fun drinks? Now we all know that frose was the drink of the summer, but did you know that it is really easy to make? Thanks to Purewow.com I was able to make it for all of my friends. All you need is 1/3 cup sugar, ¼ cup water, zest and juice of 1 lemon and 1 bottle of dry rose wine.

Directions:

  1. In a small pot bring the water, lemon, sugar all to a boil over medium heat. Make sure that the sugar is dissolved. Once that happens then put it to the side to get to room temperature.
  2. In a 13 x 9 baking dish pour the rose into it. Put it into the freezer for about 3 hours.
  3. Remove the pan and it won’t be entirely frozen, but scrap it all around and pour in the water / lemon and sugar that you had set aside to become room temperature.
  4. Then return it to the freezer.

What I do since sometimes it isn’t as frozen as I would like it to be is  I put it in a blender with some ice cubes to make it thicker. It is super easy and really delicious when you drink it.

Enjoy with all of your friends!

(image taken from purewow)


FacebookTwitterPinterest

Leave a Comment
Filed Under: Lifestyle Tagged With: Froze, Frozen Rose, Rose

Hump Day Treat – BANZA

September 14, 2016

454400-799d996db33069765233f7f97134413152425342

It’s Wednesday so you know what that means? Hump Day Treat! I have truly become Chef Jodi these past few months and have challenged myself to try all different kinds of recipes and vegetables that I normally wouldn’t have tried in the past at all. I have always been a big pasta girl and I love making spaghetti, lasagna and everything in between. I would use whole wheat pasta when I was in the mood, but sometimes I just didn’t feel like it or didn’t want to run to the store to get some. My new obsession and alternative to eating pasta has been chickpea pasta! You heard me correctly: chickpea pasta! It looks like pasta but it is made from chickpeas.I heard about Banza (chickpea pasta) months ago while shopping at Fairway when they were giving out free samples, but I wasn’t really interested in it at the time. This time when shopping the store, I saw that it was on sale: 3 boxes for $5! What a steal!!! Another healthy tip I have learned is instead of using extra virgin olive oil I use coconut oil. Not only is it a healthier substitute, but honestly you can hardly taste the difference. With certain things I still use extra virgin olive oil, but the majority of the time when I cook I use coconut oil. A staple dish I make now with my chickpea pasta is this one below.


Ingredients:

1 cup of Banza pasta

1 tomato (sliced into small cubes)

1 thin chicken breast

some garlic

¼ sliced Vidalia onion

¼ cup of sliced mushrooms

½ of sliced zucchini

Coconut oil


In a frying pan I put coconut oil and a spoon full of garlic that I buy in a glass jar from Fairway. I let that heat up a little in the pan and then I saute the cut onions. My favorite thing is grilled onions so I am sucker for putting it in the majority of my dishes. Then I add the mushrooms and the sliced zucchini and I saute it all together until it has little golden brown all over it. While I am cooking the vegetables in the pan, I am also boiling the water for the banza pasta which takes about 8 minutes to cook. Once all the veggies are done I add  the sliced chicken which depending on your personal preference you can cut into strips or into cubes. In a separate bow,l I put the cooked banza pasta with the sliced tomatoes and then once the chicken is done pour all of the ingredients in the pan into the bowl and mix it all up!!! Sometimes I will add a little bit more of coconut oil if it needs it to cover everything or you can also add from Trader Joe’s this Honey Thyme Balsamic Vinaigrette (1 tsp.) of it and just mix it all together!
Hope you all enjoy!

(image taken from google)


FacebookTwitterPinterest

Leave a Comment
Filed Under: Lifestyle Tagged With: Banza, Chickpea, Hump Day, Hump Day Treat, Pasta

Hump Day Treat: Cinnamon Sugar Pretzel Bites

June 8, 2016

sub-buzz-18490-1464979575-5

It’s Wednesday so you all know what that means… It’s time for your Hump Day Treat! I have become addicted to looking up recipes on Facebook and this one really caught my eye. Cinnamon sugar pretzel bites…HOLY YUM! I love cinnamon sugar donuts and I love pretzels so what could be bad by combining them together? Nothing. If you want to see a full video of this amazing recipe check out Tasty for Buzzfeed with this link: Cinnamon Sugar Pretzel Bites Video


Ingredients:

2 ½ cups warm water

2 ¼ teaspoons instant yeast (1 packet)

1 teaspoon salt

2 tablespoons melted butter

1 tablespoon brown sugar

4 cups flour

3 eggs


For Baking soda bath:

9 cups of water

½ cup baking soda


For Cinnamon sugar coating:

¼ cup melted butter

¾ cup sugar

3 teaspooons cinnamon


Optional Cream cheese dip

4 ounces cream cheese (room temperature)

¼ cup butter (room temperature)

½ teaspoon vanilla extract

1 ½ cups powdered sugar


Instructions:

  1. Preheat the oven to 425 degrees
  2. Dissolve yeast in warm water in a large bowl (Stir together for a minute until it is mostly combined)
  3. Add salt then add sugar then add butter and stir them all to combine them together
  4. Add flour but add the flour only 1 cup at a time until the dough is thick and no longer sticky ( to test if the dough is good poke your finger into the dough and if it bounces back you are good to go!)
  5. Flour a surface area and knead the dough for 3 minutes until it forms a smooth ball
  6. Place dough in a bowl that is lightly oiled and cover it with plastic wrap to rest for 30 minutes
  7. Bring 9 cups of water to a boil
  8. Get a baking sheet that is oiled and ready to go
  9. After the water is boiling add ½ cup of baking soda
  10. Take the dough and pull bit-sized pieces and make them into small round balls and drop them into the baking soda bath. Boil each ball for 25 seconds
  11. Remove the dough bites and place on the oiled baking sheet from step 8
  12. Beat together your eggs and brush over each pretzel bite
  13. Place in the oven and bake for 15 minutes or until the pretzel bites are golden brown
  14. While they are in the oven in a small bowl combine the sugar and cinnamon
  15. If you chose to make the cream cheese dip its simple! Combine butter and cream cheese and blend it until it is smooth
  16. Remove the pretzel bites from the oven
  17. Dip each pretzel bite into the melted butter then roll in cinnamon sugar mixture
  18. Place them all together on a serving tray together so people can dip and drip the cream cheese dip everywhere.

ENJOY!

(image taken from buzzfeed food)


FacebookTwitterPinterest

Leave a Comment
Filed Under: Lifestyle Tagged With: Buzzfeed, Buzzfeedfood, Cinnamon Sugar, Pretzel Bites

Hump Day Treat: Garlic Chicken Pesto Pasta

May 25, 2016

maxresdefault

It’s Wednesday and you know what that means? Time for a hump day treat recipe that I am sure you are all going to love. I am constantly trying to find new recipes and new things to make that are different from my everyday things that I cook. I am currently really into eating pesto, but even though people say pesto is really easy to make I still buy the jar of fresh pesto from the store. Here is a recipe that I saw from Tasty on Facebook that is Garlic Chicken pesto with whole-wheat pasta.


Ingredients:

1 box of whole-wheat pasta (bow ties or penne)

1 box of cherry tomatoes, cut up

1 tablespoon of canola oil

2 chicken breasts sliced thinly

2 tablespoons of garlic chopped

½ tablespoon of kosher salt

½ tablespoon freshly ground black pepper

¼ cup heavy cream

¼ cup of pesto

Parmesan cheese to garnish


Directions

  1. Heat a pot full of water with a little salt in it for the pasta
  2. Cook the pasta according to the directions on the box
  3. Drain the pasta and leave on the side for when you are done cooking the chicken
  4. Heat the oil in the pan
  5. Once the oil is hot put the chicken with the salt and pepper and garlic to cook until the chicken is browned
  6. Once the chicken is browned,mix in the heavy cream and pesto until everything is evenly combined
  7. Cook the chicken to a boil until the sauce has reduced for about 8 minutes
  8. In a bowl toss the pasta, cherry tomatoes and continue to stir until everything is evenly coated
  9. Sprinkle with a little bit of parmesan cheese
  10. ENJOY!

(picture taken from google)


FacebookTwitterPinterest

Leave a Comment
Filed Under: Lifestyle Tagged With: Chicken, Garlic, Hump Day, Hump Day Treat, Pasta, Pesto, Treat

Hump Day Treat: Baked Brie

May 18, 2016

FullSizeRender

Hump Day Treat!!

One of my favorite things to make that my mom makes is baked brie. I never really liked brie as a child, but as soon as I had this, I was hooked. It is a great, quick and easy, appetizer for when you are having dinner parties at your house. It is also really easy to reheat the next day if you want to eat it for seconds!


Ingredients:

Small bowl

Pastry Brush

Cookie Sheet / Cookie Pan

Parchment Paper

Pam Cooking Spray

1 Egg

1 Package of Pillsbury Crescent Rolls

1 Round Brie

1 Jar of Raspberry Preserves


Directions:

  1. Pre heat the oven to 375 Degrees
  2. Take either a cookie sheet or a pan and line in with parchment paper
  3. In a small bowl beat the one egg and set it to the side for later use
  4. Open the package of crescent rolls. There is usually 8 rolls per package. Use 4 of the rolls and don’t disconnect them so it looks like a big square. Place the square on the parchment paper. Make it a little flat and also insure that is all smooth and connected.
  5. Place the round Brie in the center of the dough.
  6. Open the jar of raspberry preserves and covers the top of the Brie with it. You don’t want it to overflow over the edges but you want a few big spoonfuls so that way when you eat the Brie every spoonful has some jelly as well.
  7. Take the edges of the crescent roll from the bottom and wrap it around the sides. Take the remaining crescent rolls and separate them. Use the separate crescent rolls and criss cross it from edge to edge of the brie so it looks like a braided material. You want the whole brie to be covered in the crescent roll.
  8. Now take the egg and use a small pastry brush. If you don’t have a pastry brush you can use your hands as well, but it will be a bit messy. Cover the outside of the dough with the egg. This will give the baked brie a shine on the outside and also cook very nicely.
  9. Place into the oven that was already pre heated to 375 for about 30 minutes. After 30 minutes check the brie and if it is fully brown on the outside you can take it out. Personally I like to check it after 30 minutes then depending on if the cheese is oozing out or not I will leave it in until its oozing just a little bit.
  10. Let the brie sit out for about 10 minutes then serve with any crackers or without if you’d like.


Enjoy!


FacebookTwitterPinterest

Leave a Comment
Filed Under: Lifestyle Tagged With: Baked Brie, Brie, Hump Day Treat

Hump Day Treat: S’mores Dip

April 20, 2016

buzzfeed : instagam s'mores pic

Happy Wednesday!!! Today’s hump day treat is one of my favorite things from my childhood: s’mores! Now, I am always up for mixing things up even with something so classic, traditional and easy as a s’more. The new thing that everyone is doing is s’mores dips! It is an easy way to make something fun for when you have some friends over and also for some of us who aren’t fortunate enough to have access to  a campfire or even a fireplace to roast our marshmallows.


Ingredients:


  • 1 package of Nestles toll house semi sweet morsels ( you can also use Hershey kisses if you want)
  • 1 package of marshmallows
  • 1 box of graham crackers
  • 1 skillet or oven safe pan
  • Pam baking spray


Directions:


  • Preheat oven to 450 degrees. While oven is preheating get all of your ingredients together.
  • Spray your pan with pam baking spray (this is something that I do lightly just so that it’s an easier clean up)
  • Pour the chocolate chips or Hershey kisses into skilled or oven safe pan. Make sure the entire bottom of the pan is covered with chocolate
  • Cover the chocolate chips with the marshmallows. If anyone does the marshmallows for thanksgiving you know that marshmallows expand so no need to make sure that they are precisely touching each other just that you don’t see a lot of chocolate from above.
  • Place the skillet or oven safe pan into the oven for 8 – 10 minutes
  • Remove from the oven when the marshmallows are toasty brown
  • Wait about a minute as you don’t want to burn yourself but place ontop of something on the table  in order to serve while hot
  • Open the graham crackers and dunk to your hearts content!

ENJOY!

(image from Buzzfeed)


FacebookTwitterPinterest

Leave a Comment
Filed Under: Lifestyle Tagged With: Buzzfeed, Buzzfeedfood, Hump Day, Hump Day Treat, S'mores, S'mores Dip

  • « Previous Page
  • 1
  • …
  • 6
  • 7
  • 8
  • 9
  • Next Page »

Social

  • Facebook
  • Instagram
  • Pinterest
  • Twitter

Archives

Site design by Aubrey Kinch Design Studio & development by Olive & Ivy Design